Thursday, August 1, 2013

Putting Turbo into Motion

    Any artist at a large entertainment studio will tell you that it is rare for an individual artist to get to take ownership of their particular contribution to a project.  Usually the work you do is one of many steps in a robust pipeline, and once the product is completed, so many different artists and departments have touched your section of the project that it can be hard to discern what you've done.  However, sometimes opportunities come along that allow you to work outside the pipeline and try something new.  I feel extremely honored and fortunate to have been given such an opportunity at DreamWorks Animation on the film Turbo, as a Visual Development and Motion Graphics artist.

Joining The Team
     When I was first approached with the task of helping produce motion graphics sequences for Turbo, I was working on the film already as a Final Layout Artist.  I had worked in 2D graphic-animation at the studio before on two previous projects, so I was on a short list of artists with design backgrounds who also knew the tools and how they could be integrated into the main pipeline.  Normally, DreamWorks has a dedicated team they call upon to help tackle such rare instances, but the entire team was already occupied on other shows in production, and since I was already on the Turbo payroll it would be an easy transition to jump over to the Art Department.
     For several weeks, I split my time between Final Layout work and Motion Graphics work.  However, once it became clear that there was an intense amount of work to be done, I became a full-time Motion Graphics artist for the show, essentially becoming a one-man operation under the umbrella of the Art Department.  I had the pleasure of working with the very talented Production Designer Michael Isaak and Art Director Richard Daskas, as well as Visual Effects Supervisor Sean Phillips.  These great leaders, with the help of other talented artists I'll mention below, gave me the chance to create the most satisfying work I've ever done in my Feature Animation career.

The Tomato Race
     The first sequence I received was "Tomato Race", in which an overzealous Turbo decides to race a dangerous "Evil" Lawnmower to a ripe Tomato that fell out into the yard.  Director David Soren and the story team dreamed up a visual approach in which Turbo envisions the world as a video game, complete with data visualizations and a heads up display.  Visual Development artist Margaret Wuller had already done a pass designing the HUD, which would feature speed "power bars" and avatars.  I was asked to design a tech-looking data visualization to represent distance and target.  Michael Isaak mentioned the motion graphics from Stranger than Fiction as a point of reference.  In the end I provided high-res 2D plates for compositing, and a 4K-sized texture map that surfacing overlaid onto the grass.  Below is a series of images that show the solutions we ended up with.  (See video at end of article for animation).


Fast Logo
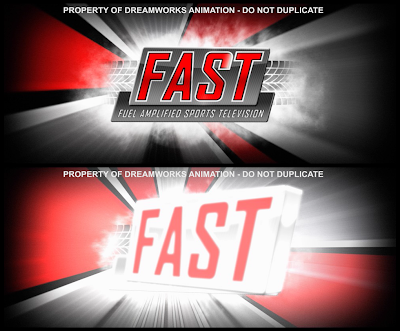
     The fictitious world of Turbo features a faux sports network where the races are broadcast, Fuel Amplified Sports Television, or FAST.  During story revisions, a visual beat featuring the FAST network logo was added to stitch two sequences together.  I was asked to come up with a moment of high-energy animation to act as the network logo before jumping into the post-race coverage.  Visual Development artist Daniel Hashimoto had already designed a great FAST logo with some slick animation, so I was able to borrow what he had done, and transform it into a faux-3D version that could fly in, and wipe the screen when finished.  All these elements I then comped over an animated starburst-like design that I based on the logo colors, and then added a bunch of smoke and burnout effects to spice it up and keep the animation alive (See animation at end of article).


Cell Phone Graphics
     At one point, a teenage kid takes video of Turbo and uploads it to an online video site, setting into motion a viral video sensation.  For these shots, we had to create simulated phone-usage graphics that would feature a proprietary video-share application, as well as e-mail and video-browsing.  On the design side, myself and Craig Church took a shot at designing an interface, icons, and browser that was a hybrid between Android-like interface, iPhone-like icons, YouTube-like video browsing, and our partners own video application Viewdini.  I ended up downloading the real Viewdini to my own smartphone to study how the application communicated its information.  Ultimately I wanted to caricature all these ideas into the most simple read possible.  Images below demonstrate our collective solution (see video at end for motion).


Viral Video
     The cell phone sequence quickly gives way to a crazy viral video sequence, featuring comedic video remixes and a stylistic shot representing the videos traveling the globe.  For the viral video, we looked at lots of psychedelic music videos like De-Lite's Groove is in the Heart, and Zlad's Elektronik Supersonik for inspiration.  In the end, Michael Isaak designed a pastel rainbow radial pattern, which I then animated, and lighting department executed the "echo" effect.  Craig Church and myself also did some laptop graphics to provide the invisible transition between the cellphones and the Taco Stand location.
     The globe shot was one of the biggest challenges we tackled, both because of the sheer amount of visual assets required to finish it, and because it was all done outside of pipeline.  Michael and Rich were extremely generous in letting me blue sky several concepts for how the shot should look.  I pitched them the concept of screens literally orbiting around a stylized planet, while continents built from tiny screens lit up as the Earth turned.  Unfortunately I cannot show the many iterations we went through in this article due to legal restrictions, but I can describe the process a bit.
     Early versions I designed looked like an Apple advert, very whitespace backgrounds with a light evenly-lit sphere as the planet, and bright pastel colors representing the screens.  Ultimately we arrived at something that resembled outer space, and we abandoned a hyper-stylized Earth for something more satellite-image based.  Rich Daskas created a painting which I used for lighting reference, and the final execution was done completely as a 3D-fake in After Effects, using a proprietary method to generate stereoscopic 3D effects, and leaving space for lighting department to drop in the animation screens that sync up to the globe background.  The shot took almost 4 months from start to finish, and we were very happy to mark it final in dailies.


JumboTron Lap Graphics
     Story department had drawn up panels in Act 3 of large jumbotrons displaying which lap the race was currently on.  I was asked to translate these ideas into broadcast graphics that surfacing could use for those shots in the movie.  Again, Mike and Rich gave me pretty creative reign, and asked I just keep it very simple.  I ended up creating a large assortment of options based on some visuals that Previz had done featuring large white and red text.  The concept I went for was somewhere between slick ESPN-style motion graphics, and cheap sports-arena animations.  Naturally, the options ranged from flying 3D elements, to spinning text, to shattering graphic elements.  Ultimately, Soren chose three of the options to use in key lap-shots, which you can see in the movie at the end of the article.
     While creating these graphics, I also wanted to incorporate the look of a worn-down jumbotron bulb-grid.  I looked at various videos of the actual jumbotrons used at the Indy 500 track and studied the matrix patterns they divide the bulbs into.  Using a multitude of filters, blends, and plug-ins, I was able to come up with something that looked pretty convincing.  As an experiment, I tried running some finished lighting-shots through the filter and presented it to Soren to see if he liked it.  Fortunately, he liked it so much, he asked me to run all of the jumbotron footage shots through my filter.  In the end, I was asked to tone down the effect quite a bit, as I had incorporated details such as dead pixel-blocks and faded color zones, and it proved to be too distracting in many shots.  However, on the third image below, you can see the unaltered jumbo-fade effect.


The SuperStove
     One of the most fun things I was asked to design was a gag we referred to as "SuperStove".  The story beat called for an over-the-top futuristic stove that could talk, and Mike and Rich once again let me go wild with anything I could think of.  Previz had mocked up a version that suggested a blue/orange color scheme, and some equalizer bars to add visual cue to the speech.  Building upon that, I then looked at future-tech HUD inspiration like Tron and Iron man, mostly for motion ideas.  To keep with the theme of the movie, I tried to incorporate elements of sports car HUD, and automotive-inspired shapes like speedometers and fuel indicators.
     Bringing all that together, we ended up with a very busy-looking tech interface, the goal being that there is so much happening, you wouldn't actually try to read any individual piece.  Not forgetting the point of the whole shot, the centerpiece featured 10 propane indicators that double as equalizer audio bars, which I animated to the voice performance.  The Art team and Soren were pleased enough with the result that they let me reprise the gag for one of the title cards in the end credits. 


Pixelation graphics
     Another fun area that I got to touch was a handful of 8-bit / LCD graphic displays.  Craig Church and Margaret Wuller designed some great graphics for cell phones and scrolling marquees that I was able to build upon.  For Tito's cell phone, I wanted to imitate the feeling of circa late 90s slow-refresh displays.  I ended up acquiring video of old Nokia bar phones, and studying them frame-by-frame to get the refresh-speed just right.  The result hopefully will remind some people of their pre-smartphone days.
     One of the final pieces I got to design was the marquee on the side of Tito's supertruck.  When developing the look of the supertruck, Wuller had written the phrase "The Fastest Taco in Town" on the marquee as a placeholder, which seemed perfect to me.  In Los Angeles there is no shortage of taco trucks parked around town, so I had plenty of inspiration to draw from.  Ultimately, in the interest of simplicity, I designed an 8-bit looking Turbo that could zip across the text and wipe it clean, before sliding it back into place.  It was surprisingly challenging trying to animate the words and graphics into a very regimented matrix grid of bulbs, while keeping the color palette as limited as possible.  The result can be seen below in the video.


     Working in the Art department on Turbo is easily one of the most positive moments of my professional creative career to date.  It is one of the rare times where my job allows me to execute while being educated.  The team was extremely supportive, super positive, and collaborative to a degree I've never experienced before.
     At the premiere of the film, our director David Soren got up to say a few words to the crew before we all watched the fruits of our labor.  He said, "We had a lot of fun making this movie, and all of that energy can be seen up on the screen".  I don't think I can say it any better than that.


David Badgerow TURBO Motion Graphics Reel from David Badgerow on Vimeo.

Wednesday, September 19, 2012

What is Layout, anyway?

        Generally when people think of animation studios, they tend to refer to everyone who works there as an "Animator".  However, especially in larger studios, only a fraction of the workforce holds the title "Animator", as there are many departments doing their part to help bring the vision to the big screen, such as Character Effects, Lighting, Story, Editorial and Modeling.  In this article, lets take a closer look at my current home department, Layout, and look at what they do to help bring the vision to life.

Layout: Bringing it All Together
        So what is layout, anyway?  The most straight forward answer is exactly as the name suggests; they lay-out the movie.  More specifically, Layout takes all the upstream assets such as backgrounds and props from art department, characters from character designers, storyboards from story department, and they put them together and lay them out according to what the sequence and shots call for, according to the script and storyboard.
        Laying out the shot, incorporating all these elements together, inherently means composing everything appropriately, as well as planning out camera moves and ground planes for animation, with guidance coming from the storyboards.  This essentially makes Layout the cinematographers of the movie.  Layout artists in traditional animation will draw each background with a suggestion of lens and focal length, depending on what the story beat calls for, just as a live action production would.  In CG Animation it is even more literal, as the virtual space uses virtual camera rigs with focal lengths, aperture and shutter speeds.
         Below you can observe an example of traditional layout, where a camera move has been planned out over the expanse of an environment.  The warped, somewhat fish-eye perspective suggests focal length as the camera pans over the artwork, following the action.  (Illustration taken from Fraser MacLean's book, Setting the Scene.  Rough Layout artwork by Fraser MacLean, final cleanup by Scott Caple)

An example of traditional layout, where a background has been laid out, and a camera move has been planned over it, as represented by red frames panning over the background.

Rough Layout
        In CG pipeline at large animation studios, Layout is often split into two departments: Rough and Final Layout.  Rough Layout, also referred to as previsualization, tend to focus on entire sequences, vs Final Layout, who tends to work on individual shots.  As mentioned before, layout artists act as the cinematographers for the movie, which effectively makes the Head of Layout the Director of Photography for the animated film.  The Head of Layout will go through a process not unlike a live action D.P.  This includes working with the Director to establish a cinematic language for the movie, planning out how sequences will be shot to help support the tone of the story or environment, and even creating a lens kit for the production, and technical aspects like cinemascope vs widescreen.
        Previz artists will then work with the Head of Layout and Director to help take the work that was done in story department, and visualize an entire sequence using rough sets and characters, as well as staging rough animation blocking and even creating rough lighting rigs, all to help create what is essentially a low-resolution version of the final look of the movie.  Once that look is established, the rough layout version of the film acts as a visual guideline for downstream departments such as Animation, Lighting, Effects, and of course Final Layout.

Storyboard panels from Story Department are translated into a rough CG version by Rough Layout Department, this acts as a guide for downstream departments including Final Layout.

Final Layout
        The Final Layout artists pick up right where Rough Layout leaves off.  It's their job to go into the sequences previz has completed, swap out all the rough temporary assets with final assets (including characters, sets, props), make sure the cameras are properly broken out into individual shots, and then send these shots to Animators to start their work (This process is often named "Anim Prep").  Simultaneously, other Final Layout artists may be working with the Art Department to do Set Dressing in a sequence, which consists of adding set details and filling out backgrounds, and sometimes will do individual shot dressing if elements need to be cheated in or out of shot.
        Once Animation has finished their work, Final Layout goes back into these completed sequences, and does a camera finaling pass ("Final Camera"), which is akin to what camera operators do on a live action set.  Shot artists will animate the camera to bring detail and realism to the camerawork in the shots, in accordance with the cinematic language as established by the Head of Layout.  This may consist of adding reactionary camera adjusts to follow animation acting, adding camera shake for camera impacts caused by explosions, wind, or heavy motion, or just adding ambient motion to help prevent static or "dead" shots.

Final Layout swaps rough assets for final assets, does set / shot dressing, camera adjusts for animation, and camera finaling before sending it to downstream departments like lighting.
        Finally, another important aspect of doing Final Camera on a sequence is helping the flow of shots through eye-tracking.  This means tracking the point of interest in each shot and making sure that the viewers eye remains in the same spot over the cut, to help the sequence flow more naturally when observed.  For example, if a shot has a character prominently placed in the right third of the frame at the end of a cut, the next shot should pick up with the point of interest in the same section of the frame.  Final Layout keeps an eye on this and adjusts cameras to facilitate this flow.  Below is a video loosely demonstrating this process, where the red dot represents the viewers eye between shots.


        Due to the iterative nature of animated films, shots, and sometimes entire sequences, will come back to the Layout department for changes.  These changes can be as large as redoing a whole sequence to facilitate major structural changes in the story, or as small as extending camera moves or creating insert shots to accommodate changes made in editorial.  Also, Layout will keep an eye on things like continuity and managing locations, sets, and even character extras and costume changes as production continues on into lighting & effects. In many ways, this makes Layout the central hub of the production process!

        And so, that concludes a closer look at the Layout department of an animated production.  For every great piece of animation acting you see performed by a great animator, there is a great layout artist making sure it's being shot appropriately and beautifully.  Though just imagine, there is also a great effects artist making sure the rain looks amazing, there is a great lighting artist creating that dramatic mood lighting, an awesome surfacing artist doing those fantastic textures and surfaces, modelers and riggers manifesting the objects and characters in the frame, character effects artists making the hair look wet and the clothes drape and flow correctly, and the list goes on.  So, the next time you see an animated film, you'll understand how there are more than just "Animators" creating the big picture!

Friday, August 24, 2012

Guardians, Roll Out!

After almost exactly a year of work, my time on Rise of the Guardians has now ended.  Final Layout wraps today, as lighting, FX, CFX, Editorial, all those guys will continue to finish off the movie, coming out in a little under 90 days from now.  The look of this movie is unlike anything I've seen, and the attention to detail continuously blows me away.


I'm very proud to have worked on this movie, with such an incredible team.  We were very lucky to have so many talented artists in layout on this beast.  Once again, Damon O'Beirne leading the way, with Mike Trull as FLO Artistic Supe, I think I learned more about composition, camera operation, tracking, framing, finaling and even pacing, on this movie than any other I've worked on.  I look forward to seeing how it all turns out when it hits theaters in Thanksgiving, and can't wait to see audience reaction.  Thanks everyone!

Tuesday, June 5, 2012

11 Second Club May 2012 Competition Entry

May has been a very busy month for me, but especially busy since I took another swing at the 11 Second Club Animation Competition.  This month was a great energy-building two-person acting clip from Rebel Without a Cause.  I got lots of great feedback and help along the way, and managed to hit 6th place out of 245 entries!  My highest rating yet!


I'll be presenting this piece to several of my animation colleagues at DreamWorks to get their intense feedback, can't wait to hear their input.  Thanks to everyone who helped contribute to this piece.  On to the next!

Monday, April 2, 2012

I'm a Demon

Over the last few weeks I decided to animate a small bit of character animation in free time at home.  I watch Tim & Eric Awesome Show Great Job pretty regularly, and possibly my favorite guest on the show is Will Forte and his various high-strung characters.  He has such interesting body language and his facial performances are so unique that I wanted to do a close study of one of my (and every other T&E fans) favorite moments in the series: the Lazy Horse Mattress nightmare "I'm a Demon" moment.


For those unfamiliar with the referenced moment, here is the segment from which this clip is inspired by:


Anyhow, was fun study.  On to the next learning project.

Wednesday, March 28, 2012

An Owl-Free Guardians Movie Trailer

Hey everyone, For the last several months I've been working on a new project at DreamWorks Animation called "Rise of the Guardians".  Despite the title, the movie features classic childhood characters such as Santa, the Easter Bunny, Sandman, the ToothFairy and of course, the Boogeyman aka "Pitch" (and no owls).  Today we officially released the first trailer, and it looks something like this.  Enjoy!


Friday, February 3, 2012

A Basic Practical Lighting Demo

Hello!  This is a tutorial I've written that will demonstrate how to build a fairly simple practical light rig.  You can use these principles to set up a good foundation light rig to use in your animation exercises, or even as the basis for an environment in a short film.  Whatever the case may be, here is a method to help guide you on your way towards a clearly lit shot.

You can use the following Maya scene file to follow along.
Light Tutorial MA File (maya ascii saved in Maya Unlimited 2011)

Here is the scene as it appears through the shot cam without lighting.


Think of lighting a scene like doing an oil painting; start with your base color to set the tone, and from there you can layer in various shades to build up the environment until eventually doing details and highlights.  In this case we will start with a very large practical light source: sky and sunlight.  Since the sky is actually visible out the windows in this scene, we can start with setting the tone for the sky first, to give a feel for the intensity of the source.


Light out window / practical source lighting
With the base tone and feeling laid in, now it's time to start placing lights.  Let's put a practical light in to match the look of the practical source, this will help motivate the direction of the rest of the lighting in the scene.  We'll do this with a giant spotlight placed outside the windows that engulfs the entire shape of our set.  In this case we'll use a cone angle of 60, intensity of 1.5 with no decay, a very tight penumbra angle of about 1.8, and a light blue color.

We'll say that it's some pretty direct sunlight around mid-afternoon, so the shadows will be fairly harsh still.  To keep solid control over look of the shadows, we'll be using shadow maps in this demo.  Enable shadow mapping and use resolution of 1024, with the filter size at 10 and bias at 0.001.  Now render the view to see the results.


Right side light room fill
Now that we have a visual cue for the lighting laid in, we can start filling the room with general bounce lighting and ambient illumination.  Since we'll only be lighting one side of the room, we can do this with two large spotlights placed at the upper corners of the opposite side of the room.  Both will use depth map shadows to help suggest some ambient occlusion without the need for an AO pass.  You can think of these as two large flood lights in the corners of the room facing inwards, this will help visualize how they should look and be placed in the scene.  We'll start with the spotlight screen-right.  Make the cone angle about 80 and angle it so it faces outward from the corner, with the cone edges flush to the walls and ceiling as much as possible.  Penumbra angle should be left at 0.


Once you've placed it, set the color value to the same as your outside light with no falloff, and the intensity to about 0.25. As a general rule, when using a light array to simulate one large ambient fill, just divide the overal intended intensity amongst the number of lights you're using.  In this case, an intensity of 0.5 divided among two lights.  We'll use a shadow map resolution of 1024 here as well, filter size at 5, bias at 0.001.  Render the scene, and it should look something like this.


Left side light room fill
With the right side fill active, now the back wall and air vent is coming into view, and a tiny bit on our two key characters.  Now we'll do the same thing but on screen left.  Set up another spotlight with the cone angle at 80, placed in the corner, edges flush against the walls and ceiling.


Start by copying the settings from the previous corner spotlight, do a render and see how that looks.  You may find you'll want to tweak the settings a bit to get desired results.  In this case I modified my second fill light slightly to have an intensity of 0.19 and color a solid white.  This was to take the edge off the blue tone I was filling the room with, and give more weight to the light coming in from the right angle on our background and characters.  Doing a render now should give you this result.


Isolating light influence
This is a good place to demonstrate an effective technique for fine tuning the look of light and shadow in a scene.  Now that we're at a point where we have different lights interacting with each other and casting shadows that are blending together, it can get difficult to discern just how much impact each light is having, and which lights are responsible for what areas of the scene.

A way to easily isolate and fine tune each light, is to assign colors to both the light and shadow of a particular light source.  For example, in this scene, we'll take the screen left spotlight and change its light casting color to a solid green.


Here you can see the areas that light is affecting, and how it will mix with the other lights in the scene.  Now, one step further, we'll change the shadow color of that light to a bright purple and render the scene once more.


Similarly now, we can visually isolate just which shadows are being created by this spotlight and adjust the intensity of the light, falloff mode and amount, and shadow filtering properties, before setting the colors back to their original desired look.  Just imagine, a scene with 20 lights when you're adjusting for final render can easily get confusing.  This technique should help you zero in on your desired results.  Now, let's move on to lighting the characters.

Key on Woman
The room lighting is looking more believable, but unfortunately, this does not showcase our characters well, so we'll have to introduce some key lights to pull them off the background.  We'll start with the woman. Again, we'll use a spotlight and place it out of frame above her, cone angle wide enough to cover her body, about 80.  An excellent trick for accurately placing a spotlight and making sure its covering your entire subject, is to select the light and in your viewer select "Look through Selected".  In this view, you can use the light like a camera and angle it interactively to look at your subject, and you can see directly if the angle is wide enough to envelop all the area you need.  See below.


Once you've placed the spotlight where desired, we'll set the falloff on this light to linear.  Due to the size of our scene, this will require us to set the intensity to 17 to get a good result.  Set color to a light blue, and penumbra angle to 7 to let the edges falloff a little.  Shadows will be on, we'll use a resolution of 1024, filter size at 3, bias at 0.001.  Rendering the camera view will demonstrate our character is now far better showcased.


Key on Man
The same process can be repeated for the man on the left.  Create another spotlight with a cone angle about 80, place it out of frame, and look through selected to help you quickly get the desired affected range within the angle of the spotlight cone.


We'll make the color of this light a bit warmer to suggest another practical light source out of frame.  The falloff will be linear for this one too, with an intensity about 11, the color tone will be a warm pink, and penumbra of about 8 like our other key light. Again, shadow resolution at 1024, but with filter size of 5 and bias of 0.001.  Also, you may find the shadows to be too intense on your subjects, in which case you'll want to change the shadow color from solid black to a mid-grey.  In this case, I've changed the shadow color to about 50% grey.  Our two key lights are set up now.  When we render the camera view, the characters will be far more readable.


Ceiling and ambient room fill
Something that remains distracting about the background scenery is the ceiling.  Because our corner lights are aimed to cover the walls and floor, the ceiling is left nearly solid black.  To remedy this we'll use a single directional light facing diagonally upwards, this will act as a natural bounce light and give some ambient fill to the ceiling.


This of course will also give a bit of under lighting to our characters.  Since we're only using this to take the edge off the darks, we'll do no shadows.  Directional lights by nature have no falloff, so we'll use an intensity of .175, and use an off-white color to suggest bounce of the general color of the room.  A new render of our camera view should look like this.


Character fill
At this point, the light rig is sufficient enough that we can now see our scene, there are adequate shadows to ground the objects in the environment, and our characters are satisfactory lit and contrast from the background.  However, it may be a good idea to put one more fill light in just for our characters in case we need it to accent the acting.  This spotlight can be positioned on the ground facing up at our characters just in front of them below frame.  Use a cone angle of about 80.


Similar to the directional light, this will be used to take the edge off the shadows currently in place, so we'll treat it similarly to our ambient fill;  no shadows turned on, but with a linear falloff to localize the effects to just our characters.  Intensity should be set around 5 and color will be same as our ambient fill light, an off-white.  These settings can be adjusted of course depending on the amount of shadow you want to remove.   Rendering the camera view should yield this result.


Negative lights
The scene is now entirely lit, and only one detail remains.  Since we are not using ambient occlusion, and now that our characters have a significant amount of lights affecting them from multiple angles, their mouths get a bit lost in the face.  To counter this and give more contrast to the mouths, we'll use negative lights to fake an occlusion area.  Create a point light with a quadratic decay, this will ensure that it is localized just to our characters mouths.  Use a negative value of about -0.7, and then parent constrain it to a joint on the character either at the top of the neck, or the base of the tongue if available.


Do this for both the boy and girl.  Try a render of our shot camera, and you should get a result similar to this.


Compare this with our previous render.  You'll see this creates a nice black void in our characters mouths, helps define that shape much better for lip sync and posing, and overall creates a more natural lighting look for the characters face.

We're Done!
That wraps it up for this light rig.  Once you have the whole rig set up, you can now make whatever tweaks are necessary to mute or highlight various aspects of your shot.  One last thing, be mindful of hotspots in your render.  You don't want to blow out areas of your shot, nor do you want areas falling into absolute darkness either.  Overall it's a good idea to keep the overall range within clipping limits, you can always tweak your render in a compositing software and stretch the tone and values later.  Happy rendering!

Tuesday, March 8, 2011

I'm Freakin' Done!

If I haven't mentioned it already in a previous blog post, for the past 6 months I've had the immense pleasure of working on Kung Fu Panda 2, the next installment of our story of Po and the furious 5. This experience has been enjoyable in absolutely every way. Our production team did a brilliant job of making sure the show was well run, that artists were always well informed and taken care of, and that everything was communicated to the utmost level of efficiency. I owe a lot of my enjoyment to them in particular.

Though also I was able to work with a completely new team this time, Damon O'Beirne head of layout and Rich Shiba, my Final Layout Supervisor. Working with both Damon & Rich together, I was able to learn more about camera work & cinematography at a sequence-wide level as well as the shot level. My new co-workers on the team were also a pleasure to work with of course, extremely helpful and always very positive, which can be very important when working on an epic-scale picture.

For now, I move on to the Kung Fu Panda 2 DVD in which we'll be creating an original short film adventure that takes place in the Kung Fu Universe, should be interesting! Until then, be sure to see the film when it comes out May 26th, it is going to be Awesome to say the least. As if this wasn't enough shameless promotion, here is our epic trailer that just came out:


Thanks for reading, now it's off to get prepared for the next project!! I leave you with a picture of me wrapping up my last shot on the movie! I love Kung Fuuuuuuuuuuuuuu--- Panda!

Saturday, March 5, 2011

11 Second Club February Results!

Hi Everyone, it's that time again. After a long hiatus for the holidays, I jumped back into the 11 Second Club competition for February. This month was a very active clip from Garden State, and certainly challenging. It's been a long time since I've attempted full body mechanics, my last two submissions being mostly from waist-up, so it was intimidating, but fun to tackle. With a short month, and many things going on, it was not easy to stay focused on this daunting endeavor, but managed to get through, and ultimately finished 14th place out of 191 entries, tied with my highest ranking ever. Here is a look at the breakdown pass:


Did quite a few breakdowns to really describe the movement of the dance, and her active explanation that follows. Now, here is the final piece:


And that is that! Again, been getting great feedback from colleagues and DreamWorks Animators to which I'm very thankful for, their input is a huge help. Now I shall take my hiatus month and hopefully jump back in again in April! Thanks for watching!